Codebase Analysis Lab
Sysprof is a “statisical, system-wide profiler for Linux”, and one of the packages in the pool for our group.
Beginning this lab, I had to start by installing fedpkg to perform the following commands:
fedpkg clone -a sysprof //move into the folder created; in this case “sysprof”
fedpkg prep //move into the “sysprof-1.2.0” folder.
Once all the files were in place, I started by searching for any files that ended with .s or .S: find $(pwd) | grep -i ".*\.s$" which returned nothing.
Next, I looked for the pattern “asm” inside all the files in the “sysprof-1.2.0” directory: grep "asm" * -r which resulted in:
TODO:		/include/asm-i386/mach-default/do_timer.h. This function

util.h:#define rmb()           asm volatile("lock; addl $0,0(%%esp)" ::: "memory")

util.h:#define cpu_relax()     asm volatile("rep; nop" ::: "memory");

util.h:#define rmb()           asm volatile("lfence" ::: "memory")

util.h:#define cpu_relax()     asm volatile("rep; nop" ::: "memory");

util.h:#define rmb()           asm volatile ("sync" ::: "memory")

util.h:#define cpu_relax()     asm volatile ("" ::: "memory");

util.h:#define rmb()           asm volatile("bcr 15,0" ::: "memory")

util.h:#define cpu_relax()     asm volatile("" ::: "memory");

util.h:# define rmb()          asm volatile("synco" ::: "memory")

util.h:# define rmb()          asm volatile("" ::: "memory")

util.h:#define cpu_relax()     asm volatile("" ::: "memory")

util.h:#define rmb()           asm volatile("" ::: "memory")

util.h:#define cpu_relax()     asm volatile("" ::: "memory");
The file TODO seemed to list a version history and not important to the requirement of this lab. However, the file util.h contained the following:
#ifndef UTIL_H

#define UTIL_H
#define FMT64 "%"G_GUINT64_FORMAT
#if defined(__i386__)
#define rmb() asm volatile("lock; addl $0,0(%%esp)" ::: "memory")
#define cpu_relax() asm volatile("rep; nop" ::: "memory");
#endif
#if defined(__x86_64__)
#define rmb() asm volatile("lfence" ::: "memory")
#define cpu_relax() asm volatile("rep; nop" ::: "memory");
#endif
#ifdef __powerpc__
#define rmb() asm volatile ("sync" ::: "memory")
#define cpu_relax() asm volatile ("" ::: "memory");
#endif
#ifdef __s390__
#define rmb() asm volatile("bcr 15,0" ::: "memory")
#define cpu_relax() asm volatile("" ::: "memory");
#endif
#ifdef __sh__
#if defined(__SH4A__) || defined(__SH5__)
# define rmb() asm volatile("synco" ::: "memory")
#else
# define rmb() asm volatile("" ::: "memory")
#endif
#define cpu_relax() asm volatile("" ::: "memory")
#endif
#ifdef __hppa__
#define rmb() asm volatile("" ::: "memory")
#define cpu_relax() asm volatile("" ::: "memory");
#endif
#endif
This file exemplifies the purpose of this course. The assembly language is so particular to a processor architecture that lines of code are needed for each architecture. In this case, there are logic statements for 32-bit x86, 64-bit x86, powerPC, IBM ESA/390, SuperH (for models 4 and 5, and then the rest), and finally for HP’s Precision Architecture. The purpose of memory barriers are to ensure specified operations, before and after, are executed in a predictable manner.
While my exposure to memory barriers is extremely limited, but doing a cursory look at memory barriers, it does seem there are solution in both the aarch64 and with c/c++; the latter could remove the architecture dependencies.
The second package we looked at was oprofile, a system-wide profiler for Linux systems. Following a similar search pattern for sysprof, I was unable to find any files ending with .s. However, checking for asm resulted in this. The inline assembly found in libperf_events/operf_utils.h looks similar to the assembly found in sysprof. Looking closer at the entire file (click on link), we can see it has a similar structure to the file found in sysprof, but also having additional lines for additional architectures – including arm and aarch64.
The other files, with the exception of op_hw_specific.h, contained the pattern “asm” as text, in the code descriptor. Taking a closer look at op_hw_specific.h (click on link), looks like a list of functions written in assembly to gather information on the processor properties of the system. With some changes to the syntax of register references, it should not be difficult to make this code adaptable for aarch64.
No Zero — Assembly Lab
Apparently I did not read the entire lab, and missed the requirement of removing the leading 0’s from 00 to 09. It was not very difficult, as I was able to complete it for both x86 and arch64 rather quickly. Here are links to both assembly programs.
I had to reorder the individual steps from my original code. I began by moving the ten place digit to the top of the code; then check the value of the division. If the result is 0, then skip processing of converting to ASCII and writing the value to the output message. The program continues to process the one place digit as normal, as we will always write that to output. I thought this was the easiest and cleanest solution.
-Richard K.
Assembler Lab Catch up
After getting some feedback from Professor Tyler regarding my issue I was able to complete the assembly lab. You can find the loop from 0 to 9 here. The loop through 00 to 30 is here.
Completing the aarch64 assembly took me a bit longer than the x86_64 portion of the lab, this is possibly due to the time in between labs, and having to relearn some of what I figured out.
Here are some of the differences:
| Description | x86_64 | aarch64 |
|---|---|---|
| value 10 into register 15 | mov $10,%r15 |
mov r15,10 |
| add 0x30 to register 15 | add 0x30,%r15 |
add x15,x15,0x30 |
| go to label if != | jne label |
bne label |
There were some other differences that caused some issues. I forgot to include “mov x0,1“, which caused my “Hello, world!” to print only once to the screen instead of 10 times during my initial phase of creating the program. I believe this is equivalent to the following command in x86_64 movq $1,%rdi.
Overall I found the x86_64 assembly easier (maybe because I did those first and was used to its layout), but like most programming languages, the logic is practically the same; it is a matter of learning the syntax in the different environment. I find myself having to take time to write a simple hello world program, but hoping with more practice, I will be able to write more verbose programs in assembly.
Assembler Lab
Assembly is not an easy language to pick up; usually I have no real issues learning new programming and scripting languages. But assembly has proven to be difficult. Many times I have to look at things backwards than I normally would when trying to determine the logic of program. I feel I have to juggle more pieces of the puzzle, which normally I would not have to concern myself with.
I still feel overwhelmed when I look at the simplest assembly, but I am beginning to understand some of it. I think most of my confusion comes from how assembly changes depending on the architecture, the manufacturer or if it’s gas or nasm. I also got to see some inline assembly in C, which also had tags that were foreign to me; it seems the learning curve is going to be steep and unforgiving.
In this lab, we introduced loops, and a little logic to our program. Beginning with X86_64 architecture, I took the hello, world! program and added some looping components to output hello, world ten times. With that amazing feat accomplished, I was able to add an increment to number the loops 0-9.
I had an issue getting the proper output. To append the increment value to the end of the text I used:
movq %r14,msg+6
Thinking this would add the single ascii character the 6th field, but apparently this is not so. My output kept coming out on a single line, and I was forced to add several empty spaces between the loop: and \n that gave me the new line. After adding 7 additional blank spaces did the new line finally show. This is the assembly code I created to get the following output:
Loop: 0

Loop: 1

Loop: 2

Loop: 3

Loop: 4

Loop: 5

Loop: 6

Loop: 7

Loop: 8

Loop: 9
This was after many failed attempts and watching the dreaded endless loop while spamming ctrl-c in hopes of stopping the loop before it gets out of hand.
The lab continues by asking us to do the same in aarch64, but when trying to compile the example assembly in that folder, I received the following error:
hello.s: Assembler messages:

hello.s:5: Error: too many memory references for `mov'

hello.s:6: Error: no such instruction: `adr x1,msg'

hello.s:7: Error: too many memory references for `mov'

hello.s:9: Error: too many memory references for `mov'

hello.s:10: Error: no such instruction: `svc 1'

hello.s:12: Error: too many memory references for `mov'

hello.s:13: Error: too many memory references for `mov'

hello.s:14: Error: no such instruction: `svc 0'

make: *** [hello] Error 1
I attemped to resolve the issue, and it seemed like a common problem from posts found on the internet, but being inexperienced in assembly, I felt lost in how to resolve this issue. If someone has some input, feel free to let me know. I will speak with people in class and get this resolved, and post the aarch64 parts of this lab within a few days.
Continuing on with the lab (x86_64 portions), we are asked to expand on the loop to 30, and to display two characters (00-30). This was a bit tricky. At first, I wanted to try something different than what was suggested, and I failed miserably.
Instead of doing division (which I admit was much simpler), I tried to do it with logic in the attempt to learn more about jumps and compares through trial. After spending some time on it, and failing into the late hours of the night, I completed it as it was recommended in the lab. Doing it this way was much simpler, and provided some insight into the div command and how some of the registers work. This is my final code and output:
Loop:00

Loop:01

Loop:02

Loop:03

Loop:04

Loop:05

Loop:06

Loop:07

Loop:08

Loop:09

Loop:10

Loop:11

Loop:12

Loop:13

Loop:14

Loop:15

Loop:16

Loop:17

Loop:18

Loop:19

Loop:20

Loop:21

Loop:22

Loop:23

Loop:24

Loop:25

Loop:26

Loop:27

Loop:28

Loop:29

Loop:30
I am still getting the hang of using the registries; having such finite control over memory adds a few more balls I need to juggle as I work. I will have to review my notes on register use; understanding why I should use register x over register y (performance?).
The lab was interesting and not as daunting as I first imaged. Sitting down and looking though some of the documentation helped. I look forward to completing the aarch64 once I resolve my errors.
-Richard K.
C -complier -options Lab
Before getting into the lab, I must congratulate the Fedora community in finally making the process of setting up the operating system painless. Attempting to install Fedora in the past, I would have to spend some time trying to get my wireless card to work, while other Linux Distros would be good to go out of the box. After installing Fedora 20 on my laptop, I was pleasantly surprised that my wireless network card was ready to connect.
To start the C compliler lab, I needed to install C libraries so I could use the standard libraries, such as #include . However, yum kept returning an error when attempting to install them. After speaking with Professor Tyler, he suggested I turn off SELinux for the yum install; and his suggestion allowed the C libraries to be installed properly. Just don’t forget to turn SELinux back on.
Using a simple Hello, World! C program, we compiled it with the following complier options:
- -g :: enable debugging information
- -O0 :: do not optimize
- -fno-builtin :: do not use builtin function optimizations
Using objdump, and the proper options, we are able to take a closer look at the compiled Hello, World! program. Below are a few of the options we used to take a closer look at the code, and to see what it happening closer to the machine level. You can click on the options to see the output generated:
- -f # display header information for the entire file
- -s # display per-section summary information
- -d # disassemble sections containing code
- --source # (implies -d) show source code, if available, along with disassembly
Looking at the output for the first time, it looked very daunting and may as well been scatches on the wall. And to some degree it still looks that way; however with what we learned in class and spending some time looking at the output, I can see the beginning of some semblance of what is going on. In the output generated with the --source option, where it reads printf("Hello World!\n");, we see:
int main() {

  400530:	55                   	push   %rbp

  400531:	48 89 e5             	mov    %rsp,%rbp

    printf("Hello World!\n");

  400534:	bf e0 05 40 00       	mov    $0x4005e0,%edi

  400539:	b8 00 00 00 00       	mov    $0x0,%eax

  40053e:	e8 cd fe ff ff       	callq  400410
My interpertation (I am hoping I am right), push %rbp, decreases the stack and places the value of the base pointer into memory, and the following line copies the value on the stack to the base. The line that reads 400534, moves the hex value of 0x4005e0 to the edi register, and then copy the hex value 0x0 to the eax register. Line 40053e calls the printf function (PLT = procedure linkage table?). Hopefully I am right, but if I’m wrong, feel free to let me know.
The lab continues by having us compile the Hello, World! with new options or with the removal of existing options. The first is to add the -static option. Immediatly we can see a difference. The compiled binary without the -static option is 9566B in size; while the binary of the file generated with the -static option is 812710B.
Using objdump with the -d option generates a text file that has 139564 lines, opposed to 183 lines when used against the binary that was complied without the -static option. The -static option prevents the linking of shared libraries, which means those libraries must be compiled with the program. Obviously this is going to have an impact on the size of the binary file, and the objdump file output.
The lab continues by having us remove the -fno-builtin option when compiling. Looking at the objdump with --source option. Looking in the PLT section, instead of printf being pushed, it is a command called puts. Puts is a C command that prints out a string with a new line. Since we are calling the printf function to display a string with a new line, it is more optimal (as the complier sees it) to use puts instead of printf.
Next, we remove the -g option when compling with GCC. This excludes debugging information from from the binary, causing the the output to be smaller. We can see the removal of the debug sections by using objdump with the -s option. The debug information would normally be at the bottom, however it is missing from this. This would explain the size difference in the binary.
Step 4 of the lab has us look at how values are loaded into the registery (order of the registries are used. It seems that they are loaded into registries in a specific order. Here are a few excerpts at various counts:
-
One Arguement:
mov 0x200abb(%rip),%eax # 601034 =a= -
Three Arguements:
mov    0x200acf(%rip),%ecx        # 60103c =c=

mov    0x200ac5(%rip),%edx        # 601038 =b=

mov 0x200abb(%rip),%eax # 601034 =a= -
Ten Arguements:
mov    0x200b1c(%rip),%r10d        # 60105c =j=

mov    0x200b0d(%rip),%r9d        # 601054 =i=

mov    0x200b02(%rip),%r8d        # 601050 =h=

mov    0x200af8(%rip),%edi        # 60104c =g=

mov    0x200aee(%rip),%esi        # 601048 =f=

mov    0x200ae4(%rip),%ebx        # 601044 =e=

mov    0x200ad9(%rip),%r11d        # 601040 =d=

mov    0x200acf(%rip),%ecx        # 60103c =c=

mov    0x200ac5(%rip),%edx        # 601038 =b=

mov    0x200abb(%rip),%eax        # 601034 =a=
WordPress seems to have an issue display greater than and less than signs (even with code tags), so the = = are less than and greater than signs. You can find a sample output here. It seems the order that the registers are used is eax, edx, ecx, r11d, ebx, esi, edi, r8d, r9d, r10d — perhaps the next incarnation of assemly should display it as like r1, r2, r3, … ?
The subsequence instructions for this lab has us use the printf fuction outside of the main() code; and changing the optimization level from 0 to 3 (-O0 to -O3). The output of objdump for the former is thus. We can see a section of assembly specifically for the function that was created, and the call for it in the “main()” section. This gave me insight to this part of the assembly code:
400540:	55                   	push   %rbp

400541:	48 89 e5             	mov    %rsp,%rbp
Each time a function is called (both main and outhw), these two lines appear. This seems to move the current base pointer onto the stack, and replaces it with the value of the stack pointer for processing. Then the following lines:
400553:	5d                   	pop    %rbp

400554:	c3                   	retq
returns the main function on the stack back to the bp for further processing.
Lastly, we changed the optimization level from 0 to 3. We can see a significant change when using objdump with the –source option. Compared to -O0 option, the main part of the program has been shifted sooner in the output. It is also only 7 lines opposed to the 15 lines in the original compliation. This is mostly due to the removal of moving things onto and off the stack. The GCC optimizer seems to have noticed that it does not need to create a a stack to execute the binary and complied it without the use of it.
After completing this lab, I have never appreciated the C complier more.
-Richard K.
SPO600 Code Review Lab
The 1 of 2 picks for this lab is soundconverter. It is on a GPLv3 license, and their homepage can be found here.
Soundconverter uses launchpad to track their bugs, along with other features it provides to the community. While navigating that site, I was able to locate two bugs that were fixed by patches provided by members of the community; it seems in one of their translations, not everything in the GUI was translated to Hungarian from english – you can find the complete bug here.
The bug submitter is also the bug resolver (patch provider). Upon writing the patch for it, he was requested to paste it in the bug comments or “create a pull request on github”. This bug was resolved in two days, and the patch is available through the link in the comments, and under the Patch link on the right hand side. There also seems to be an option to add a patch to this bug, but requires a launchpad account.
The 2 of 2 pick for this lab is xfce4-xkb-plugin, which is licensed under BSD. The webpage for this package is here. While this package relates to keyboard layouts, XFCE provides an entire desktop interface for many Linux distributions including Fedora.
They use the all too familiar Bugzilla for their bug tracking system. Since they maintain so many packages, one can spend a day and forever going through it all. I was able to find a bug resolved with a patch. This bug involved updating an out of date library with a newer library. A community member provided the patch and Jesper Karlsson applied the patch to the master branch in git – 2 years later (according to the time stamps).
It seems both use similar processes. In both cases, the bug reporter was the same person supplying the fix to the bug. While in the first case, with soundconverter, the reporter received a reply within a day, and had their fix promptly applied, the latter took 2 years to reply (perhaps the fix was applied earlier but he never responded? – either way it was a long time).
Assuming the maintainers are available and regularly check active bugs, allowing members to create a bug and submit a fix for it right away could save many people from headaches. It would allow others who experience the same issues to quickly get resolutions or even contribute to the fix by looking at the available patch; having multiple eyes on the code helps keep it efficient and clean.
A disadvantage to this approach is that untested “fixes” is available for everyone before being fully vetted.
There is also a large list of bug reports that go unresolved from looking at the bug list on XFCE, and in the comments you can read it was “closed” from a mass old bug sweep that told users “if it was still an issue, the bug should be reopened”.
Overall the processes seem to work for anything major or critical, but some of the minor issues, or only affecting a small group of people may not see any attention.
-Richard K.
Point 3 Release
Well the end of the semester is here and I have survived another exam week (minus my claw like hand from all the writing). Before getting into my 0.3 release, I just wanted to say (for all the people contemplating taking SBR600 in the future) that it is worth taking.
My earlier semesters involving Linux, we never install applications through source or rpms, just through yum install. Knowing how to install from source and rpms was exceptionally helpful this semester, where (due to CentOS) I had to install Apache from source (for version 2.4). This meant I had to install apr, apr-utils and pcre from source, and then direct the Apache source install to use those packages instead of the ones found on the default installation of CentOS (those versions being too old to use with Apache 2.4). SBR600 is not available in the coming Winter semester, but for those that will be in school when it will be available again, ensure it is on your course schedule.
With the site up and running, and not having the know how and the time to learn CSS, I could not use my remaining time to get the site to look more Pidora-ish. While I could simply go into the configuration files and make code changes, these changes would be undone after any update. So in place of making these superficial changes, I opted to look at possible extensions that may be useful to the site.
The one that immediately caught my eye was HiddenNameandMail, which would obfuscate member email addresses with dummy accounts set up by the administrator. At first I thought this was a good idea, but later realized that this might hinder communication between members, and we should be encouraging collaboration and communication. Below are screen shots of how members and non members will see email addresses in bug reports.
Members

Anonymous Users
The public face of the site will just show the username portion of the email address, which will not match email regular expressions. If enough people feel that obfuscation of the email address would be more beneficial, feel free to leave a comment and I will look into getting that extension installed.
Instead I have opted to install the extension called Sitemap, which will allow crawler based search engines (such as Google) to go through the site, making it easier for people who may be experiencing issues that have already been reported. I went over the installation process in an earlier post. However, if you are like myself, you learn a lot more by watching the process instead of just reading the document.
Here is a YouTube video of the Sitemap installation process, I would recommend watching it in 720p, if you want the commands on screen to be legible.
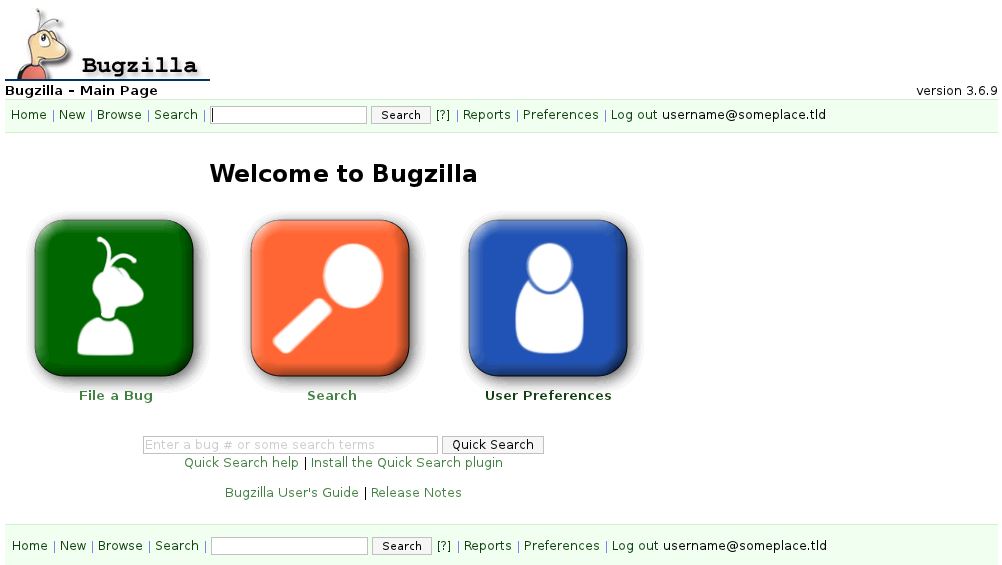
In an earlier post, I looked into additional skins for the Bugzilla site, to offer people the ability to customize their interface. I personally liked the Flat Green skin opposed to the default Dusk skin. Below is the YouTube video chronicling the installation process.
Mozilla did a great job making Bugzilla portable across different platforms and allowing customization of it (I may learn some CSS and see if I can make the necessary changes to fit the site with Pidora).
Here is a YouTube video showing the installation process of Bugzilla itself.
Recording your desktop for this purpose can be an annoying processs; I started over and over again due to small errors and my need for perfection.
You can find the Pidora Bugzilla site here, if you want to sign up or just check it out.
I enjoyed SBR600, and will be taking the things I learned here past academia. I would recommend it for anyone else contemplating the course.
-Richard K.
My .3 release.
CPAN
Prior to working with Bugzilla, I have never used CPAN, or knew of it’s existence. While installing Bugzilla, I ran into some errors because it was missing some modules. Doing some research, was to install a CPAN library, as Bugzilla uses the CPAN library extensively (my guess is to make Bugzilla portable across multiple platforms). However, it was brought to my attention that it may not be the wisest method to resolve the issue. Due to this information, and being informed that much of it was available through yum, I decided to investigate.
Running /usr/share/bugzilla/checksetup.pl on the Bugzilla server, results in a long listed output, which contains the following lines:
COMMANDS TO INSTALL OPTIONAL MODULES:
GD: yum install "perl(GD)"
Chart: yum install "perl(Chart::Lines)"
Template-GD: yum install "perl(Template::Plugin::GD::Image)"
GDTextUtil: yum install "perl(GD::Text)"
GDGraph: yum install "perl(GD::Graph)"
We can resolve the dependencies by entering the commands listed above, but installing through CPAN may not be desired, but we may want to install the optional modules that rely on these packages. Doing a simple yum search can resolve this. Entering yum search perl | grep "GD" results in:
perl-GD.x86_64 : Perl interface to the GD graphics library

perl-GDGraph3d.noarch : 3D graph generation package for Perl

gdal-perl.x86_64 : Perl modules for the GDAL file format library

perl-GD-Barcode.noarch : Create barcode image with GD

perl-GD-SVG.noarch : GD::SVG enables SVG output from scripts written using GD

perl-GDGraph.noarch : Graph generation package for Perl

perl-GDTextUtil.noarch : Text utilities for use with GD

perl-GD-SecurityImage.noarch : Security image (captcha) generator

perl-Template-GD.noarch : GD plugin(s) for the Template Toolkit
The first package listed resolving the issue listed. We can also see some other packages listed that may resolve some of the other optional requirements. One may want to keep this in mind when installing Bugzilla and wanting to minimize what is installed from CPAN.
-Richard K.
New Look
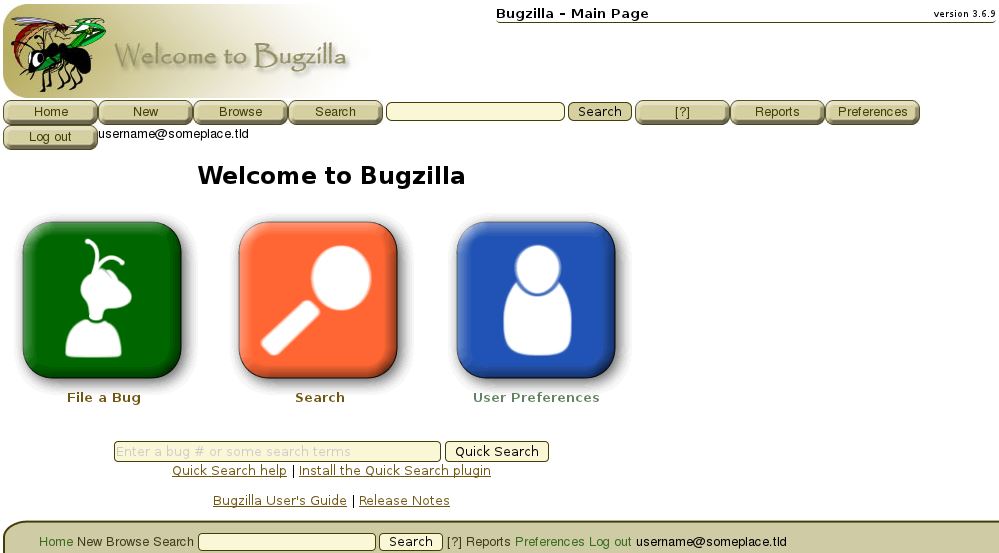
I decided to try installing some skins to give users some customization on the Pidora Bugzilla site when it is ready. The two I decided to try out were Flat Green and Brown Curvy. Below are screen shots of each.
Dusk (Default)

Flat Green
Brown Curvy
The installation process was pretty simple, and I did not really encounter any real issues, besides trying to find the bugzilla folder that holds additional skins. The installation process is below:
- wget ftp://ftp.heterodyne.us/pub/Bugzilla/FlatGreen.tgz
- wget https://wiki.mozilla.org/images/e/ef/Browncurvy.zip
- for the tgz file:
tar xzvf FlatGreen.tgz - for the zip file: unzip Browncurvy.zip
Move the folders created to /usr/share/bugzilla/skins/contrib/
mv FlatGreen /usr/share/bugzilla/skins/contrib
mv BrownCurvy /usr/share/bugzilla/skins/contrib
Once both folders have been moved, enter the command:
/usr/share/bugzilla/checksetup.pl
This will precompile the templates and fix any file permissions due to the mv command; sample output below.
Creating ./skins/contrib/FlatGreen/yui directory…
Creating ./skins/contrib/FlatGreen/IE-fixes.css…
Creating ./skins/contrib/FlatGreen/admin.css…
Creating ./skins/contrib/FlatGreen/create_attachment.css…
Creating ./skins/contrib/FlatGreen/dependency-tree.css…
Creating ./skins/contrib/FlatGreen/duplicates.css…
Creating ./skins/contrib/FlatGreen/editusers.css…
Creating ./skins/contrib/FlatGreen/help.css…
Creating ./skins/contrib/FlatGreen/page.css…
Creating ./skins/contrib/FlatGreen/panel.css…
Creating ./skins/contrib/FlatGreen/params.css…
Creating ./skins/contrib/FlatGreen/reports.css…
Creating ./skins/contrib/FlatGreen/show_bug.css…
Creating ./skins/contrib/FlatGreen/show_multiple.css…
Creating ./skins/contrib/FlatGreen/summarize-time.css…
Creating ./skins/contrib/FlatGreen/voting.css…
Creating ./skins/contrib/FlatGreen/yui/calendar.css…
Removing existing compiled templates…
Precompiling templates…done.
Fixing file permissions…
After this process, I was able to select the new screen from my preferences menu.
-Richard K.
=> 2 Release
With Bugzilla installed, I have been looking into several addons and extensions available for Bugzilla. While you can find a list on the official MozillaWiki, below is a list of client side addons that could be useful or just simply interesting.
Bug Shooting: A quick method to grab a screenshot and attach it to a Bugzilla bug. Sometimes a single screen capture can be more helpful than a block of text.
Auto Complete: Bugzilla 4.0+ adds this functionally by default, but older versions can also enjoy the convenience of auto complete.
Bugzilla Assignee List: Allows a list of users for possible assignee components.
HiddenNameAndMail: maps a dummy email/username to user’s email accounts.
InLine History: view bug activity inline with comments when looking at bugs. This extension requires version 4.0+.
MultipleEditNoEmail: Provides a check box to prevent mail being sent out to users for minor updates.
profanivore: Replaces any profanity with (*****). Could possibly use this to block Ads as well.
Bugzilla site map: Allows search engine spiders to crawl the site. Only public information (information available to logged out users) viewed.
TraceParser: Formats stack tracers that are pasted into comments, formatting them to easy reading. It will also check for duplicate stack traces, and allows uers to find simlilar stack traces.
The installation of an extension is rather simple, and below you will find a instructions on how to successfully complete some that may be implemented on the Pidora Bugzilla. There are some screen shots, so feel free to comment on what you think; if you think it will be helpful or make things awkward to use. Or if you feel an extension should be included.
I feel that allowing search engine spiders to go through the public face of the site is important, as it will allow users to search for possible solutions to bugs through popular search engines. I will go through the steps to install bugzilla-sitemap. The only differences is in the method to download the extension.
The more popular ones you can simply click on the download link, but others are on version control systems. For example, to grab the AutoComplete, you will need mercurial. You can yum install mercurial if you do not have the package installed, and grab the folder and files with the following command:
hg clone https://bitbucket.org/domruf/bugzillaautocomplete
Other types of CVS (Concurrent Version System) are used depending on the extension.
Bugzilla Assignee List (Subversion): svn checkout http://bugzilla-assignee-list.googlecode.com/svn/trunk bugzilla-assignee-list
Provanivore (Bazaar): bzr branch http://bzr.mozilla.org/bugzilla/extensions/profanivore/trunk
Bugzilla Sitemap
Download the tarball for this extension:
wget http://bugzilla-sitemap.googlecode.com/files/Sitemap-1.0.tar.gz
Untar the tarball and move the created directory “Sitemap” to the extension folder of Bugzilla:
tar xzvf Sitemap-1.0.tar.gz
mv Sitemap /usr/share/bugzilla/extensions/
Install the module — this will take some time:
/usr/share/bugzilla/install-module.pl Search::Sitemap
Once that process is complete, run the following to rebuilt templates:
/usr/share/bugzilla/checksetup.pl
The above command no only recomplies the templates, it fixes any file permission issues (usually from mv command), and it contacts Yahoo!, Google and Ask to notify those search engines about the Bugzilla site. Below is the output generated once the installation is complete
Removing existing compiled templates...

Precompiling templates...done.

Fixing file permissions...

Pinging search engines to let them know about our sitemap:

Submitting http://localhost/bugzilla/page.cgi?id=sitemap/sitemap.xml to Search::Sitemap::Pinger::Yahoo=HASH(0x729d0f0) failed: 403 Forbidden

     Yahoo: FAILED

Submitting http://localhost/bugzilla/page.cgi?id=sitemap/sitemap.xml to Search::Sitemap::Pinger::Google=HASH(0x72983e0) failed: 400 Bad Request

    Google: FAILED

Submitting http://localhost/bugzilla/page.cgi?id=sitemap/sitemap.xml to Search::Sitemap::Pinger::Ask=HASH(0x74066f0) failed: 500 Can't connect to submissions.ask.com:80 (Bad hostname 'submissions.ask.com')

       Ask: FAILED

      Live: OK

There were some failures while submitting the sitemap to certain search

engines. If you wait a few minutes and run checksetup again, we will

attempt to submit your sitemap again.
In this case, being in a test environment, we received fail messages. Having our bugs indexed by popular search engines could save Pidora users some headache, and possibly bring more into the community.
If there are any extensions you are interested in and want me to go over the installation, leave a comment and I will see about putting up a guide specific for that extension.
-Richard K.
My 0.2 release.

Recent Comments